
What is the medical billing process and why does it matter?
The medical billing process is a critical series of steps that ensure healthcare providers are properly reimbursed for their services. From patient registration to claim submission and payment posting, understanding this process helps improve efficiency and minimize denied claims.
If you’re a healthcare provider—whether you’re a physician, pharmacist, or mental health professional—you’ll need to understand the medical billing process and all its ins and outs to make sure you’re getting properly reimbursed for your hard work!
Upgrade to an intelligent billing system built for modern healthcare.

Streamlining the Medical Billing Process
The medical billing process is more than just sending bills—it’s a strategic workflow that ensures providers get paid accurately and on time. From patient intake to final payment posting, each stage needs precision, compliance, and clear communication.
What You’ll Learn in This Article:
- How patient capture and insurance verification set the stage for successful claims
- Best practices in charge entry, coding accuracy (CPT + ICD‑10), and claim scrubbing to reduce denials
- The difference between claims submission, rejections, and denials, and how to manage each effectively
- How payment posting, remittance advice (RA), and explanation of benefits (EOB) factor into revenue cycle performance
- Key strategies for clean claims, denial resolution, appeal workflows, and compliance
Ideal for billing teams, practice managers, and providers, this guide will help you master each step—improving cash flow, reducing errors, and delivering a better financial experience for everyone involved.
What Is the Medical Billing Process?
The medical billing process includes all steps of communication from first registering a patient, through recording any care or treatments administered, to receiving reimbursement for your services rendered. The main participants in this process are the patient, the provider, and the insurance company, and there is significant communication between each of these parties.
This process is also known as the billing cycle. The average length of time it takes for your practice to complete its billing cycle is an important metric for evaluating the overall effectiveness of your office. For reference, the industry takes between 40 and 50 days on average to complete a billing cycle, although highly efficient practices are able to receive payment in 30 days or less. How does your office compare to these benchmarks?
There are several steps you can take to speed up your medical billing process, including taking proactive measures to improve your first-pass claims acceptance rate and adopting medical billing software to streamline your billing process in general. And there are many reasons you might want to do this, including the fact that the shorter your billing cycle, the more reliable your cash flow.
But before we talk about shortening your billing cycle, it’s important to understand each of the steps involved. Let’s take a closer look at them.
Medical Billing Process Steps
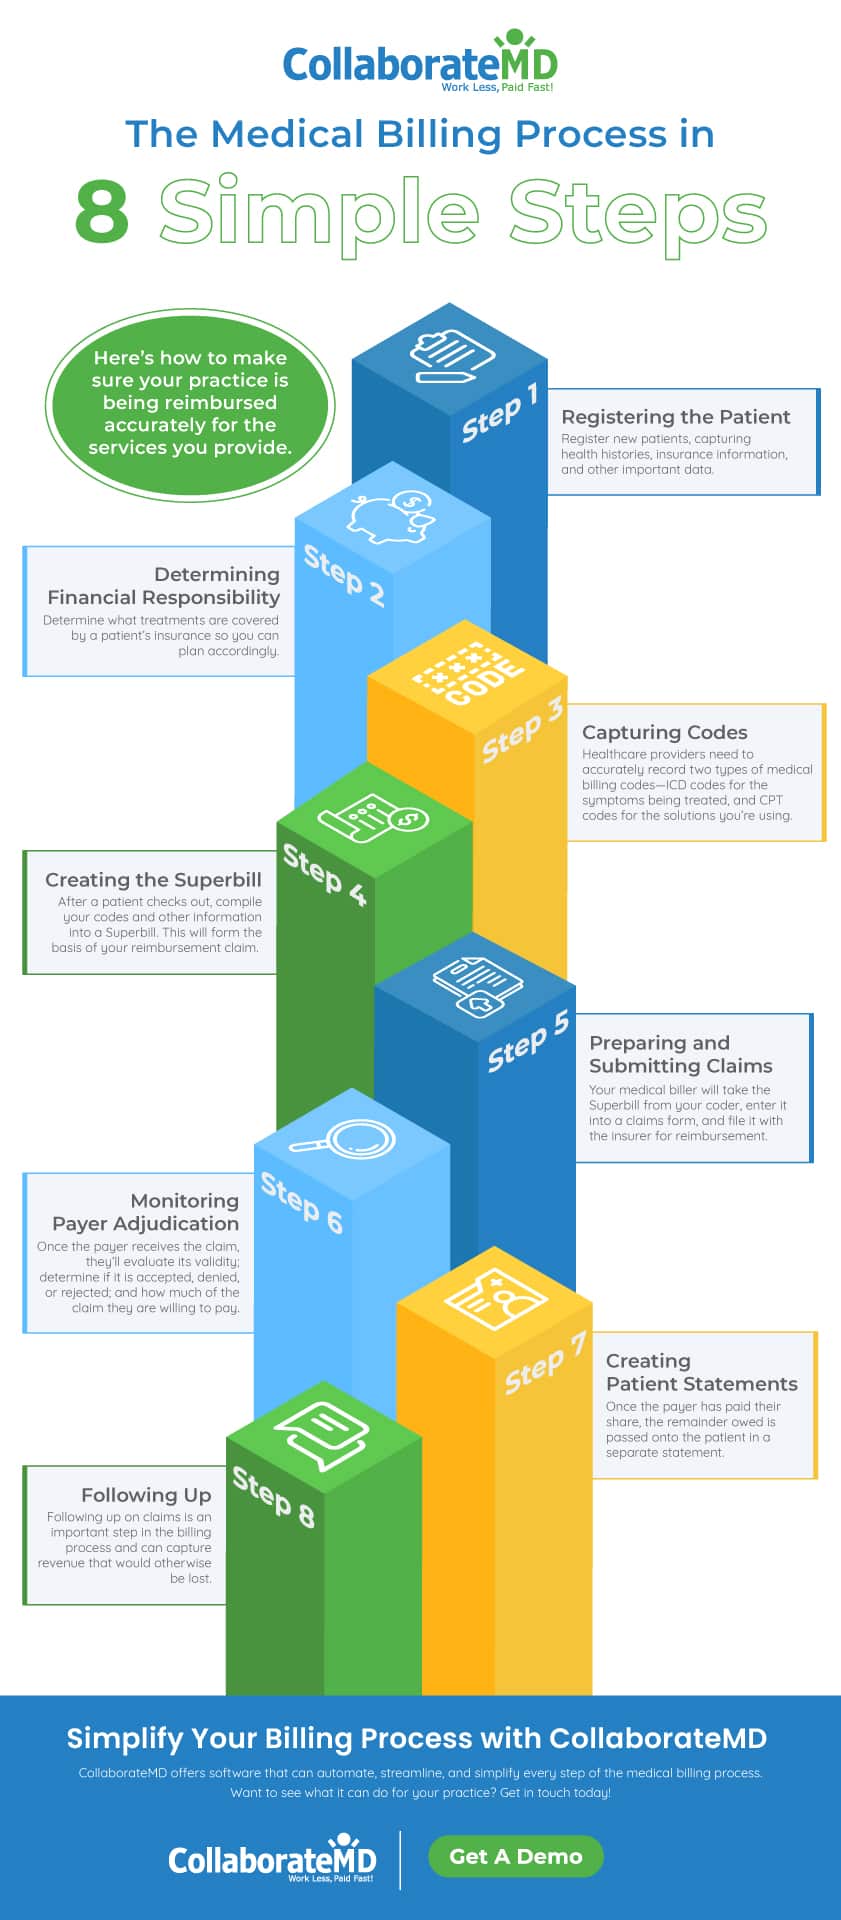
Step 1: Registering the Patient
The billing process begins when a patient requests your services. You’ll need to register new patients, capturing health histories, insurance information, and other important data. This information will carry over for returning patients, but you’ll still have to update their files with their latest reason for a visit and any information that may have changed since the last time.
Step 2: Determining Financial Responsibility
Once a patient is registered, you’ll need to determine what treatments are covered by their insurance plan. Insurance companies can have some pretty specific rules about what is and isn’t covered, and these can change from year to year, so you’ll need to make sure your practice is always up to date on the latest requirements.
Step 3: Capturing Codes
Medical billing uses two sets of codes to record and classify patient/provider interactions. The first system comes from the World Health Organization. Called the International Classification of Diseases (ICD) codes, this set of codes corresponds to the problem or problems being evaluated or treated. ICD codes are updated regularly. The current code system is ICD-10, with an updated set of ICD-11 codes set to become the standard in 2025.
The other codes used in medical billing are Current Procedural Terminology (CPT) codes, developed by the American Medical Association (AMA). These CPT codes refer to the treatments administered by the practitioner, making them vital to ensuring accurate reimbursement for services rendered.
When you see a patient, you must record both ICD codes for the symptoms you are examining and CPT codes for the treatments you are administering. Because there are over 10,000 CPT codes and roughly 70,000 ICD codes, we highly recommend employing a smart software solution to make sure your medical coding is always up to date.

Step 4: Creating the Superbill
After a patient checks out, it’s time to compile your codes and other information into a document called the Superbill. This Superbill will form the basis of your reimbursement claim. It will contain vital information about the provider, the patient, and what occurred during the visit so that a proper claim can be filed. Here’s a quick rundown of what your Superbill should include:
- Provider Information
- Full Name
- National Provider Identifier (NPI) number
- Location
- Contact Information
- Referring Provider Name and NPI
- Signature
- Patient Information
- Full Name
- Date of Birth
- Contact Information
- Insurance Information
- Visit Information
- Date of Visit
- All Relevant CPT and ICD Codes
- Any Fees Charged
- Duration of Visit

Step 5: Preparing and Submitting Claims
Your medical biller will use the Superbill to create a claim and file it with the insurer for reimbursement. The more complete and accurate this information, the more likely it is to be accepted on the first pass. First-pass acceptance is also called a “clean claim,” and it is one of the best ways to measure the efficiency of your billing cycle.
The most effective offices can achieve a clean claims rate of 99%. This can lead to some serious improvements in your overall revenue—if you’re curious what a 99% first-pass acceptance rate would do for your office, spend some time exploring our Revenue Calculator!
Step 6: Monitoring Payer Adjudication
Once the payer receives the claim, they’ll evaluate its validity and determine if it is accepted, denied, or rejected. It’s important to understand the differences between these three outcomes:
- Accepted
- An accepted claim is the ideal outcome.
- If a claim is accepted, it will be processed for payment.
- Note that this does not mean it will be paid in full—payment amounts are dependent upon the specifics of the insurance plan.
- Denied
- Denied claims are those that have been properly filed, but do not meet the criteria for payment.
- Typically, this means that you have billed for a service that is not covered by the insurer, which is why it’s important to establish what is and isn’t covered as part of your patient registration process.
- When a claim is denied, it’s important to understand why it was denied and what you can do to prevent it from happening again in the future.
- Rejected
- Rejected claims are not the same as denied claims!
- A claim that is rejected by the insurer cannot be processed, usually as a result of errors within the claim or mistakes made during the filing process.
- A large percentage of rejected claims are never resubmitted, resulting in a significant amount of unnecessarily lost revenue.
- It’s vital to have a system in place for reworking and resubmitting rejected claims in a timely fashion so that your revenue flow remains strong.
Step 7: Creating Patient Statements
Once the payer has paid their share, the remainder owed is passed onto the patient in a separate statement. If all goes well, the patient will pay you for your time and effort and the billing cycle that began with their requesting a visit will come to a close. However, that is not always the case. It’s important for you as the provider to be aware of this step and to follow up as necessary to ensure you receive payment promptly.
Step 8: Following Up
Following up on claims is an important step of the billing process and can capture revenue that would otherwise be lost. Once a patient receives their statement, your practice should do everything in its power to prevent common billing issues and make payment as simple and painless as possible.
Simplifying the payment process for your patients helps encourage payments in full and on time. Self-service is key here—implementing a patient portal with an online payment system, for instance, allows your patients to pay their bills when and where it’s convenient for them to do so. The more barriers to payment you can remove, the less likely it will be for a patient statement to pass on to a collections agency.

Medical Billing Process Infographic
We’ve put together a brief version of the medical billing process for you to reference:
Download the Medical Billing Process Infographic!
Benefits of Integrating Medical Billing Software into Your Process
The medical billing process may only have eight major steps, but it has tons of moving parts. Make life easier on yourself and your staff by using the future of medical billing software to improve your revenue cycle management.
The right software will make patient registration easier with electronic forms and automated data entry. It will help determine financial responsibility by referencing the latest information from insurers, and it will simplify the process of medical coding by automatically suggesting from the thousands of CPT and ICD codes available—then feeding that data directly into the Superbill for a faster claims process.
Medical billing software will help improve your clean claims rate by conducting a virtual audit of a claim before it goes out for payment, and the addition of automated reminders will help your office stay on top of the adjudication process and follow up with rejected claims—and late patient payments.
CollaborateMD offers software that can automate, streamline, and simplify every step of the medical billing process. Want to see what it can do for your practice? Get in touch today!

FAQ Section: Medical Billing Process
What is the medical billing process?
The medical billing process is a series of steps healthcare providers follow to submit claims to insurance companies and collect payment for services. It includes tasks like patient registration, coding, claims submission, and payment posting.
What are the steps in the medical billing cycle?
The typical medical billing cycle includes:
- Patient registration
- Insurance verification
- Documentation of services
- Medical coding
- Charge entry
- Claims submission
- Payment posting
- Denial management
- Patient billing and collections
What are common medical billing procedures?
Common procedures include verifying insurance coverage, coding medical services using ICD/CPT codes, submitting claims, following up on denied claims, and collecting patient payments. Accurate documentation and timely follow-up are essential for effective billing.
How long does the medical billing process take?
The timeline varies depending on insurance response times and claim accuracy, but most clean claims are processed within 30 days. Errors or denials can extend this timeline significantly.
Why is the medical billing cycle important?
The billing cycle is crucial for ensuring timely and accurate reimbursement. A well-managed cycle reduces denials, improves cash flow, and enhances overall financial performance for healthcare practices.
What’s the difference between medical billing and medical coding?
Medical coding involves converting patient care into standardized codes, while billing uses those codes to create and submit claims to insurers. Both are essential for accurate reimbursement and compliance.
What tools or software help streamline the billing process?
Medical billing software, practice management systems, clearinghouses, and electronic health records (EHR) platforms can streamline workflows, reduce errors, and accelerate payment timelines.